Thursday, August 6, 2020

How to record the screen on your Mac


How to record the screen on your Mac

You can make a video recording of the entire screen or just a selected portion of it.

Use Shift-Command-5

If you're using macOS Mojave or later, press Shift-Command (⌘)-5 on your keyboard to see onscreen controls for recording the entire screenrecording a selected portion of the screen, or capturing a still image of your screen. You can also record the screen with QuickTime Player instead.


Record the entire screen

  1. Click the Record Entire Screen button in the onscreen controls. Your pointer changes to a camera .
  2. Click any screen to start recording that screen, or click Record in the onscreen controls.
  3. To stop recording, click the Stop Recording button in the menu bar. Or press Command-Control-Esc (Escape).
  4. Use the thumbnail to trim, share, save, or take other actions.

Record a selected portion of the screen

  1. Click the Record Selected Portion button in the onscreen controls. 
  2. Drag to select an area of the screen to record. To move the entire selection, drag from within the selection.
  3. To start recording, click Record in the onscreen controls.
  4. To stop recording, click the Stop Recording button in the menu bar. Or press Command-Control-Esc (Escape).
  5. Use the thumbnail to trim, share, save, or take other actions.  

Trim, share, and save

After you stop recording, a thumbnail of the video appears briefly in the lower-right corner of your screen.

  • Take no action or swipe the thumbnail to the right and the recording is automatically saved. 
  • Click the thumbnail to open the recording. You can then click the Trim button to trim the recording, or click the Share button to share it.  
  • Drag the thumbnail to move the recording to another location, such as to a document, an email, a Finder window, or the Trash. 
  • Control-click the thumbnail for more options. For example, you can change the save location, open the recording in an app, or delete the recording without saving it.

Change the settings

Click Options in the onscreen controls to change these settings:

  • Save to: Choose where your recordings are automatically saved, such as Desktop, Documents, or Clipboard.
  • Timer: Choose when to begin recording: immediately, 5 seconds, or 10 seconds after you click to record.
  • Microphone: To record your voice or other audio along with your recording, choose a microphone.
  • Show Floating Thumbnail: Choose whether to show the thumbnail
  • Remember Last Selection: Choose whether to default to the selections you made the last time you used this tool.
  • Show Mouse Clicks: Choose whether to show a black circle around your pointer when you click in the recording.

Use QuickTime Player

  1. Open QuickTime Player from your Applications folder, then choose File > New Screen Recording from the menu bar. You will then see either the onscreen controls described above or the Screen Recording window described in the following steps. 
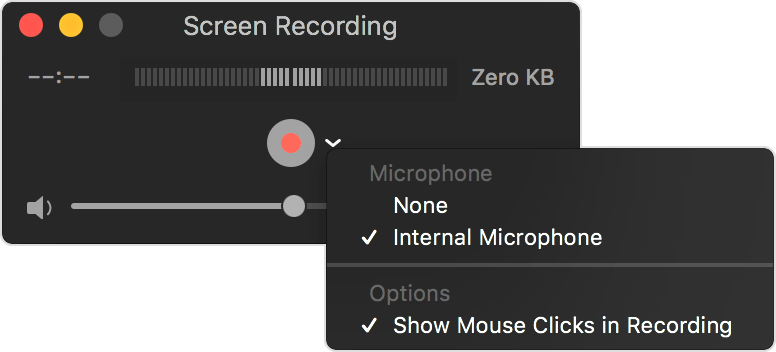
  2. Before starting your recording, you can click the arrow next to the Record button to change the recording settings:
    • To record your voice or other audio with the screen recording, choose a microphone. To monitor that audio during recording, adjust the volume slider (if you get audio feedback, lower the volume or use headphones with a microphone). 
    • To show a black circle around your pointer when you click, choose Show Mouse Clicks in Recording.
  3. To start recording, click the Record button and then take one of these actions:
    • Click anywhere on the screen to begin recording the entire screen.
    • Or drag to select an area to record, then click Start Recording within that area.
  4. To stop recording, click the Stop button in the menu bar, or press Command-Control-Esc (Escape).
  5. After you stop recording, QuickTime Player automatically opens the recording. You can now play, edit, or share the recording.

Learn more

  • When saving your recording automatically, your Mac uses the name ”Screen Recording date at time.mov”.
  • To cancel making a recording, press the Esc key before clicking to record.
  • You can open screen recordings with QuickTime Player, iMovie, and other apps that can edit or view videos.
  • Some apps, such as DVD Player, might not let you record their windows.

Wednesday, July 29, 2020

Let's Talk about Realme C11

Hello Friends aaj main aap k leya Realme C11 ki kush spces laya hun...

Display 16.5cm(6.5") Mini-drop Fullscreen Resolution: 1600x720 HD+ Screen-to-body ratio: 88.7% Charging & Battery 5000mAh(typ) Massive Battery 5V/2A charger & cable Micro-USB Camera 13MP AI Dual Camera Rear Camera 13MP Primary Camera f/2.2 aperture 5P lens 2MP Portrait Lens f/2.4 aperture Photography functions AI Beauty, Filter Mode, HDR, Panoramic View, Portrait Mode, Timelapse, Slo-mo, Super NightScape, Expert Mode Video recording Support 1080P/30fps video recording Support 720P/30fps video recording Front Camera 5MP AI Selfie f/2.4 aperture FOV 77.9° Photography functions AI Beauty, Filter Mode, HDR, Panoramic View, Portrait Mode, Timelapse Video recording Support 1080P/30fps video recording Support 720P/30fps video recording Processor MediaTek Helio G35 CPU: Octa-core, 64bits, Up to 2.3GHz Storage & RAM 2GB +32GB RAM: 2GB ROM: 32GB Cellular & Wireless 3-Card Slot 2 SIM Card + 1 MicroSD Frequency band GSM: 850/900/1800/1900 WCDMA: 1/5/8 FDD-LTE: Bands 1/3/5/7/8/20/28 TD-LTE: Bands 38/40/41(2535-2655MHz) Wireless 802.11 b/g/n WiFi Bluetooth 5.0 Navigation GPS / Glonass / Beidou Size & Weight Height: 164.4mm Width: 75.9mm Depth: 9.1mm* Weight≈ 196g. Sensors Magnetic induction sensor / Light sensor / Proximity sensor / Acceleration sensor System realme UI Based on Android 10 Packing List realme C11,Charger,USB cable,Screen protection film,SIM card tool Quick guide,Important info booklet with warranty card Share, Support, Subscribe!!! #MobileShopDarshan Subscribe- YouTube/mobileshopdarshan Facebook-  Facebook/mobileshopdarshan Instagram- instagram/mobileshopdarshan

HOW TO PLAY All PAID TO FREE HD CHANNEL LIVE ON YOU ANDROID TV || JIO TV & AIRTEL TV ||

HELLO FRIENDS AAJ MAIN AAP K LEYA EK APPLICATION LAYA HUN JIS KI HELP SE AAP LIVE TV , SABHI HD CHANNEL AAP FREE MAIN DEKH SAKTE HO LIFE TIME ....AGAR AAP KO JEH VIDEO PASAND AAYE TO PLEASE VIDEO KO LIKE SHARE KARNA MAT BHULNA THANKS

AAP LINK = https://drive.google.com/file/d/120aDxVS7KqNRZOcT_lsDu7ksT8FdDtc6/view?usp=sharing My Video shooting Mobile = https://amzn.to/2BBJPFY My Mic = https://amzn.to/306HVXm Ring light Stand = https://amzn.to/2P3YOvG Tri pod = https://amzn.to/2CTBBJS Alexa show 5 = https://amzn.to/307iTY1 MI smart Light = https://amzn.to/338GQQV Vu samrt Tv = https://amzn.to/3hMx76W Share, Support, Subscribe!!! #MobileShopDarshan Subscribe- YouTube/mobileshopdarshan Facebook-  Facebook/mobileshopdarshan Instagram- instagram/mobileshopdarshan OUR SITE - https://mobileshopdarshan.blogspot.com

Nord is Best Midrange phone or Not ??????? IN HINDI || MOBILE SHOP DARSHAN || PERSONAL REVIEW ||

HI Friends One plus Nord ek best midrange smart phone hai becoz is Price main aap ko ek best camera phone , best display , best 5g phone, best fast charging phone and best gaming phone milne wala hai so aagar aap is phone ko buy karna chahte ho to niche diye gaye link par click karo ... One plus buy link.


8/128= https://amzn.to/336uwAr 12/256= https://amzn.to/39AsxWh My Video shooting Mobile = https://amzn.to/2BBJPFY My Mic = https://amzn.to/306HVXm Ring light Stand = https://amzn.to/2P3YOvG Tri pod = https://amzn.to/2CTBBJS Alexa show 5 = https://amzn.to/307iTY1 MI smart Light = https://amzn.to/338GQQV One Plus Nord Specs Dimensions Height: 158.3 mm Width: 73.3 mm Thickness: 8.2 mm Weight: 184g Display Size: 16.36 centimeters (6.44 inches) Resolution: 2400x1080 pixels 408ppi Refresh Rate: 90 Hz Type: Fluid AMOLED Cover Glass: Corning® Gorilla® Glass 5 Operating System: OxygenOS based on Android™ 10 CPU: Qualcomm® Snapdragon™ 765G 5G mobile platform GPU: Adreno 620 RAM: 6GB/8GB/12GB LPDDR4X Storage: 64GB/128GB/256GB UFS2.1 Battery: 4115 mAh (non-removable) Warp Charge 30T fast charging (5V/6A) Camera Rear camera - Main Sensor: 48 mp Sony IMX586 Ultra wide angle lens -8mp Depth lene- 5mp Macro lens- 2mp Flash-Dual LED Flash Video 1080P video at 30/60 fps, 4k 30 fps Super slow motion: 1080P video at 240 fps Time-Lapse: 1080P 30 fps, 4k 30 fps Front Camera Sensor: Sony IMX616-32mp Ultra Wide Angle Lens - Front 8mp 4K video at 30/60 fps 1080P video at 30/60 fps Face unlock, HDR, Screen flash, Face retouching, Filters, Ultra wide selfie Connectivity LTE/LTE-A 4×4 MIMO, support up to DL Cat 18/UL Cat 13 (1.2Gbps /150Mbps), depending on carrier support Band GSM: GSM850, GSM900, GSM1800, GSM1900 WCDMA: B1, B2, B4, B5, B8, B9, B19 LTE-FDD: B1, 2, 3, 4, 5, 7, 8, 12, 17, 18, 19, 20, 26 LTE-TDD: B38, 39, 40, 41, 46 5G: N78 MIMO: LTE: B1, 3, 40 NR: N78 *Network connectivity may vary depending on carrier’s network and related service deployment. Wi-Fi 2x2 MIMO, Wi-Fi 802.11 a/b/g/n/ac, 2.4G/5G Bluetooth Bluetooth 5.1, support aptX & aptX HD & LDAC & AAC NFC NFC enabled Positioning GPS (L1+L5 Dual Band), GLONASS, Galileo (E1+E5a Dual Band), Beidou, A-GPS, NavIC Check carrier compatibility Sensors In-display fingerprint sensor Accelerometer Electronic compass Gyroscope Ambient light sensor Proximity sensor Sensor Core Ports USB 2.0, Type-C, support standard Type-C earphone Dual nano-SIM slot Buttons Gestures and on-screen navigation support Left: Volume key Right: Power key, Alert slider Audio Super linear speaker Noise cancellation support Multimedia Audio supported formats Playback: MP3, AAC, AAC+, WMA, AMR-NB, AMR-WB, WAV, FLAC, APE, OGG, MID, M4A, IMY Recording: WAV, AAC Video supported formats Playback: MKV, MOV, MP4, H.265(HEVC), AVI, TS, 3GP, FLV, WEBM Recording: MP4 Image supported formats Playback: Playback: JPEG, PNG, BMP, GIF, WEB, HEIF, HEIC, RAW Output: JPEG, DNG In The Box OnePlus Nord Screen protector (pre-applied) Warp Charge 30 power adapter Warp Type-C cable (Support USB 2.0) Quick start guide Welcome letter Safety information and warranty card Brand sticker Phone case SIM tray ejector Highest SAR value & Plastic recycling card Red Cable Club Membership card Share, Support, Subscribe!!! #MobileShopDarshan Subscribe- YouTube/mobileshopdarshan Facebook-  Facebook/mobileshopdarshan Instagram- instagram/mobileshopdarshan

Sunday, July 26, 2020

How To Fix STUCK AT APPLE LOGO ENDLESS REBOOT Trick iOS 13 iPhone, iPod & iPad IN HINDI


HOW To REBOOT Devices


iPhone X and Or Later Se 2 2nd gen  (iPhone 8, 8 Plus, X, Xs, Xs Max, Xr)
To perform a hard reboot on the iPhone 8 and newer, press and quickly release the Volume Up button, then do the same for the Volume Down button. Follow up by pressing the Side button, and hold until the display suddenly shuts off


iPhone 8 and Newer (iPhone 8, 8 Plus, X, Xs, Xs Max, Xr)
To perform a hard reboot on the iPhone 8 and newer, press and quickly release the Volume Up button, then do the same for the Volume Down button. Follow up by pressing the Side button, and hold until the display suddenly shuts off

iPhone 7 & 7 Plus
To force restart (hard reset) the iPhone 7, press and hold the Sleep/Wake button + Volume Down button for 10 seconds. Because of the Home button change, it's been replaced by the Volume Down button during the process

iPhone 6s/6s Plus and Older
To force restart or hard reset your device, press and hold the Sleep/Wake and Home buttons simultaneously for at least ten seconds. After about ten seconds, you should see the Apple logo and can release the buttons. That's it. Now you know how to hard reset your iPhone 6s and iPhone 6s Plus

Share, Support, Subscribe!!!
#MobileShopDarshan
Subscribe- YouTube/mobileshopdarshan
Facebook-  Facebook/mobileshopdarshan
Instagram- instagram/mobileshopdarshan
 .........................................................................................................................................
HINDI TRASLATE
iPhone X और बाद में Se 2 2nd gen (iPhone 8, 8 Plus, X, Xs, Xs Max, Xr)
IPhone 8 और नए पर एक हार्ड रिबूट करने के लिए, वॉल्यूम बटन दबाएं और जल्दी से जारी करें, फिर वॉल्यूम डाउन बटन के लिए भी ऐसा ही करें। साइड बटन दबाकर फॉलो करें, और तब तक होल्ड करें जब तक डिस्प्ले अचानक बंद न हो जाए
iPhone 8 और नया (iPhone 8, 8 Plus, X, Xs, Xs Max, Xr)
र बटन को दबाएं और जल्दी से छोड़ दें, फिर वॉल्यूम डाउन बटन के लिए भी ऐसा ही करें। साइड बटन दबाकर फॉलो करें, और तब तक होल्ड करें जब तक डिस्प्ले अचानक बंद न हो जाए iPhone 7 और 7 प्लस IPhone 7 को पुनरारंभ करने (हार्ड री
IPhone 8 और नए पर एक हार्ड रिबूट करने के लिए, वॉल्यूम ऊ
पसेट) के लिए, 10 सेकंड के लिए स्लीप / वेक बटन + वॉल्यूम डाउन बटन को दबाकर रखें। होम बटन परिवर्तन के कारण, इसे प्रक्रिया के दौरान वॉल्यूम डाउन बटन द्वारा बदल दिया गया है
iPhone 6s / 6s प्लस और पुराने अपने डिवाइस को रिस्टार्ट या हार्ड रिसेट करने के लिए, कम से कम दस सेकंड के लिए स्लीप / वेक और होम बटन को एक साथ दबाकर रखें। लगभग दस सेकंड के बाद, आपको Apple लोगो देखना चाहिए और बटन जारी कर सकते हैं। बस। अब आप जानते हैं कि अपने iPhone 6s और iPhone 6s Plus को हार्ड रीसेट कैसे करें शेयर, समर्थन, सदस्यता लें !!!
#MobileShopDarshan  


How to record the screen on your Mac

How to record the screen on your Mac You can make a video recording of the entire screen or just a selected portion of it. Use Shift-Command...